このページは、nAGライブラリのJupyterノートブックExampleの日本語翻訳版です。オリジナルのノートブックはインタラクティブに操作することができます。
import numpy as np
from numba import jit, float64, int64
from numba.experimental import jitclass
import matplotlib.pyplot as plt
%matplotlib inline
np.set_printoptions(precision=16, suppress=True)

from naginterfaces.library import machine, roots
from naginterfaces.base.utils import NagAlgorithmicWarning
eps = machine.precision()

from numba.core.errors import NumbaDeprecationWarning, NumbaPendingDeprecationWarning, NumbaWarning
import warnings
warnings.simplefilter('ignore', category=NumbaDeprecationWarning)
warnings.simplefilter('ignore', category=NumbaPendingDeprecationWarning)
warnings.simplefilter('ignore', category=NumbaWarning)
warnings.simplefilter('ignore', category=NagAlgorithmicWarning)
アンダーソン加速を使用して固定点反復を高速化する
cos(x) = xの固定点解を加速する
電卓に任意の実数を入力し、繰り返しコサインボタンを押します。結果は最終的に約0.739085に収束します。これは方程式\(x = \cos(x)\)の解です。これは固定点反復の一例です。一般的なケースは、以下のような計算です
\[\begin{align} x_{n+1} = f(x_n) \end{align}\]
これは収束基準に達するまで繰り返されます。このような計算は、金融、物理学、工学の多くの分野で自然に発生します。
コサインの固定点計算をPythonで以下のようにコード化できます
def fcos(x):
    """Performs one iteration of the cosine fixed point iteration
    """
    return np.cos(x)

def fp_driver(x0, func, tol):
    x = x0 # starting guess
    err = 1000000 # Huge error to start things off
    iterations = 0
    while err > tol:
        nextx = func(x)
        err = np.sqrt((x - nextx)**2)
        x = nextx
        iterations += 1
    return iterations, x

fp_driver(3, fcos, 1e-15)
(88, 0.7390851332151603)
1e-15の許容誤差で88回の反復で収束することが示されました。自然に浮かぶ質問は「何らかの方法で収束を加速できないだろうか?」というものですが、その答えは「はい」で、アンダーソン加速と呼ばれる技術を使用します。アンダーソン加速は1960年代から化学分野で知られていましたが、比較的最近まで他の分野ではあまり知られていませんでした。この技術を説明したWalker and Niの2011年の論文は、2019年後半の時点で245回以上引用されています。
nAGは最近、最近傍相関行列(NCM)の評価におけるこの技術の成功を受けて、nAGライブラリに2つのアンダーソン加速ルーチンを導入しました(加速された最近傍相関行列ルーチンはnaginterfaces.library.correg.corrmat_fixedに実装されています)。ここでは、nAGの標準的なアンダーソン加速ルーチンroots.sys_func_aaの使用方法を示します。
roots.sys_func_aaは上記のコードのfp_driverの役割を果たします。以下は、余弦の例でそれを使用する方法です。
def nag_fcos(x):
    """Performs one iteration of the cosine fixed point iteration
    """
    # nAGはf(x) - xを返す必要があることに注意してください。単にf(x)だけではありません。
    return np.cos(x)-x

m = 0 # When m=0, Acceleration is turned off so this is identical to running a basic fixed-point calculation
tol = 1e-10
nag_cos = roots.sys_func_aa(nag_fcos, 3.0, tol, eps, m).x
nag_cosarray([0.7390851331723561])加速を有効にするには、mを0より大きい値に設定します。
nag_cos = roots.sys_func_aa(nag_fcos, 3.0, tol, eps, m=1).x
nag_cosarray([0.7390851331642223])残念ながら、nAGルーチンは収束に必要な反復回数を返さないため、自分たちで数えない限り、加速の利点が何であるかわかりません。これを行うために、nag_fcos関数に渡すヘルパークラスを使用します。
class fpinfo:
    """A class used to get information to/from the nAG routine
    """
    def __init__(self):
        self.iterations = 0

def nag_fcos_withdata(x, data):
    """Performs one iteration of the cosine fixed point iteration
    """
    data.iterations += 1
    # nAGはf(x) - xを返す必要があることに注意してください。単にf(x)だけではありません。
    return np.cos(x)-x

tol = 1e-15
data = fpinfo()
nag_cos = roots.sys_func_aa(nag_fcos_withdata, 3.0, tol, eps, m=0, data=data).x
print(f"Solution found was {nag_cos[0]} in {data.iterations} iterations with acceleration switched off")
data = fpinfo()
nag_cos = roots.sys_func_aa(nag_fcos_withdata, 3.0, tol, eps, m=1, data=data).x
print(f"Solution found was {nag_cos[0]} in {data.iterations} iterations with acceleration switched on")
Solution found was 0.7390851332151611 in 88 iterations with acceleration switched off
Solution found was 0.7390851332151607 in 10 iterations with acceleration switched on加速をオンにするだけで反復回数が約9倍改善されるのは非常に有用です。次に、固定点反復のより難しい例を考えてみましょう。
固定点反復を用いたポアソン方程式の解法
ポアソン方程式は楕円型偏微分方程式(PDE)で、2次元では以下の形をとります
\[\begin{align} \nabla^2 u & = f(x,y)\nonumber \\ \left( \frac{\partial^2}{\partial x^2} + \frac{\partial^2}{\partial y^2} \right)u(x,y) &= f(x,y)\nonumber \end{align}\]
\(f(x)=0\)の特殊な場合はラプラス方程式と呼ばれます。ポアソン方程式とラプラス方程式はどちらも物理学や工学の多くの分野で現れます。
ポアソン方程式の数値解を必要とする一例として、2本の平行な電荷線の電位場の定常状態を求めることが挙げられます。一方の総電荷が+1で、もう一方が-1です。領域境界ではディリクレ境界条件 \(u(x,y)=0\) が適用されます。
def source(N):
    # ソース項に対応する行列を生成します
    # 各線上に +/- 1 の総電荷を持つ2本の線源が必要
    # これが我々のポアソン方程式における関数 f(x, y) です
    x0 = np.zeros((N, N))
    h = 1/(N-1)
    source_rows = range((N//4), (3*N//4))
    source_col1 = N//4
    source_col2 = 3*N//4

    x0[source_rows, source_col1] = x0[source_rows, source_col1] + 1/(N*0.5*h**2)
    x0[source_rows, source_col2] = x0[source_rows, source_col2] - 1/(N*0.5*h**2)
    return x0

def init_problem(N=50):
    # N x N の問題領域を初期化された線源で初期化します
    x0 = np.zeros((N, N))
    x0 += source(N)
    return x0

x0 = init_problem(50)
plt.title('Initial conditions of our example problem on a 50 x 50 grid')
_ = plt.imshow(x0)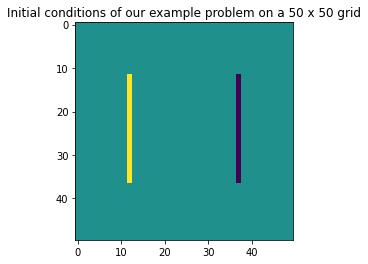
PDEの解法に関する入門コースでは、このようなシステムの解法として3つの方法を紹介することが多いです:
- ヤコビ法
- ガウス・ザイデル法
- 逐次過緩和法
このノートブックと同様の表記法を用いてこれらの方法を詳しく論じた論文として、D.J. Evansによる並列S.O.R.反復法があります。
ここで、3つの解法を順番に実装していきます。
ヤコビ法
離散化されたグリッドの第n番目の配置\(u^{n}\)から始めて、境界条件を適用する端を除く全ての(i,j)番目のグリッド点に以下の式を適用することで、次の配置を得ます。
\[\begin{align} u^{n+1}_{j,i} = \frac{1}{4} \left(u^{n}_{j+1,i} +u^{n}_{j-1,i} +u^{n}_{j,i+1} +u^{n}_{j,i-1} \right)+\frac{h^2}{4}f_{j,i} \end{align}\]
この反復のPythonでの実装は以下の通りです。
@jit
def jacobi(x, source, solverinfo):
    """Performs one iteration of the jacobi method

    Arguments:
    x - N x N Matrix containing the previous iteration of the solution
    source - N x N Matrix containing our source function evaluated on the grid
    solverinfo - Takes a solverinfo object to get info in/out of the solver
    """
    N = x.shape[0]
    nextx = np.zeros((N, N))
    h = 1/(N-1)
    # グリッドを繰り返し処理する
    # 内部の点のみを反復処理することで、エッジを変更せずに保持し、したがって
    # 境界条件として、端では x = 0 とする。
    for i in range(1, N - 1):
        for j in range(1, N - 1):
            nextx[j, i] = 0.25 * (x[j+1, i] + x[j, i+1] + x[j-1, i] + x[j, i-1]) + 0.25*h**2*source[j, i]
    solverinfo.iterations += 1
    return nextx
次に、ヤコビ反復関数のドライバーが必要です。私たちの問題を解決するための後続の方法を駆動するのに十分な一般性を持つものです。
# この仕様はNumbaのjitコンパイルに必要です
spec = [
    ('iterations', int64),
    ('w', float64)
]

@jitclass(spec)
class solverinfo:
    """A class used to get information to/from a solver
    """
    def __init__(self, _w=1):
        self.iterations = 0
        self.w = 1 # Used for SOR and ignored for everything else

def solve_poisson(x, tol, data, method):
    """Solves Poisson's equation

    x - N x N Matrix containing the initial configuration of the problem space
    tol - Convergence tolerance
    data - A solverinfo object to get arbitrary info in/out of the solver
    method - A function that performs one solution iteration
    """
    N = int(np.sqrt(x.size))
    err = 1 # Big error to start things off with
    while err > tol:
        nextx = method(x, source(N), data)
        err = np.sqrt(np.sum((x - nextx)**2))
        x = np.copy(nextx)
    return x
最後に、ヤコビ法を使用して問題のインスタンスを設定し、解くことができます。
N = 100
u = init_problem(N)
jacobi_info = solverinfo()
tol = 1e-9
jacobi_sol = solve_poisson(u, tol, jacobi_info, jacobi)
print(f"Gauss-Seidel on a {N} by {N} grid")
print(f"Solution found in {jacobi_info.iterations} iterations")
_ = plt.imshow(jacobi_sol)
Gauss-Seidel on a 100 by 100 grid
Solution found in 28734 iterations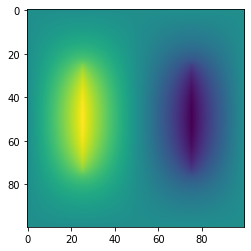
ポアソン方程式によって電位が得られます。完全を期すために、勾配を取って電場を求めてみましょう
Ex, Ey = np.gradient(jacobi_sol)
E = np.sqrt(Ex**2+Ey**2) # Magnitude of Electric field
plt.imshow(E)
_ = plt.title('Electric Field')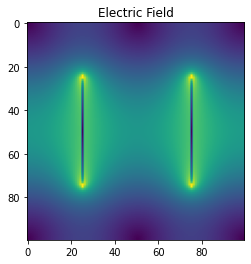
28,734回の反復は多すぎるので、より洗練された手法でもっと良い結果が得られることを期待します。幸いなことに、それは可能であり、「より洗練された」手法は皆さんが恐れるほど複雑ではありません。
ガウス・ザイデル法
ヤコビ法では、解空間の2つの独立したコピーを保持していました。新しい解の各要素は、古い解の周囲の要素から計算されます。ガウス・ザイデル法では、新しいグリッド要素が利用可能になるとすぐにそれを使用します。つまり、グリッド上の位置(j,i)に到達したとき、すでにu_{j-1,i}とu_{j,i-1}を更新しているので、古い値の代わりにそれらを使用できます。
\[\begin{align} u^{n+1}_{j,i} = \frac{1}{4} \left(u^{n}_{j+1,i} +u^{n+1}_{j-1,i} +u^{n}_{j,i+1} +u^{n+1}_{j,i-1} \right)+\frac{h^2}{4}f_{j,i} \end{align}\]
したがって、ガウス・ザイデル反復は次のようになります
@jit
def gauss_seidel(x, source, solverinfo):
    N = x.shape[0]
    nextx = np.copy(x)
    h = 1/(N-1)
    for i in range(1, N - 1):
        for j in range(1, N - 1):
            nextx[j, i] = 0.25 * (nextx[j+1, i] + nextx[j, i+1] + nextx[j-1, i] + nextx[j, i-1]) + 0.25*h**2*source[j, i]
    solverinfo.iterations += 1
    return nextx
N = 100
u = init_problem(N)
gs_info = solverinfo()
tol = 1e-9
gs_sol = solve_poisson(u, tol, gs_info, gauss_seidel)
print(f"Gauss--Seidel on a {N} by {N} grid")
print(f"Solution found in {gs_info.iterations} iterations")
fig, axes = plt.subplots(nrows=1, ncols=2, figsize=(10, 6))
axes[0].imshow(gs_sol)
axes[0].set_title('Potential')
Ex, Ey = np.gradient(gs_sol)
E = np.sqrt(Ex**2+Ey**2) # Magnitude of Electric field
axes[1].imshow(E)
_ = axes[1].set_title('Electric Field')Gauss--Seidel on a 100 by 100 grid
Solution found in 14877 iterations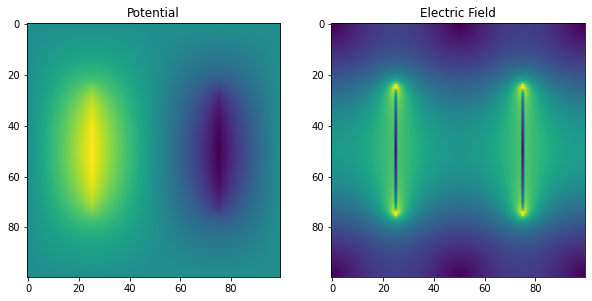
反復回数がほぼ半減しており、これほど小さな投資に対して素晴らしい見返りです。この問題の標準的な扱いには、ガウス-ザイデル法の拡張である逐次過緩和法(SOR)というさらなる手法があります。
逐次過緩和法 (SOR)
上記のガウス-ザイデル更新式(3)の右辺に \(u_{i,j}^n\) を加えて引いてみます
\[\begin{align} u^{n+1}_{j,i} & = \frac{1}{4} \left(u^{n}_{j+1,i} +u^{n+1}_{j-1,i} +u^{n}_{j,i+1} +u^{n+1}_{j,i-1} +h^2 f_{j,i} \right) \nonumber \\ & = u_{i,j}^n + \frac{1}{4} \left(u^{n}_{j+1,i} +u^{n+1}_{j-1,i} +u^{n}_{j,i+1} +u^{n+1}_{j,i-1} + h^2 f_{j,i} - 4 u_{i,j}^n \right) \nonumber \\ & = u_{i,j}^n + r_{i,j} \end{align}\]
ここで \(r_{i,j}\) はガウス-ザイデル法の1回の反復における \(u_{i,j}\) の変化量です。この変化量が良好であれば、より多くの同じ変化がさらに良いかもしれません。実際、ガウス-ザイデル法の収束は、以下のようにより大きな変化を加えることで加速できることが分かっています。
\[\begin{align} u^{n+1}_{j,i} & = u_{i,j}^n + \omega r_{i,j} \end{align}\]
ここで \(\omega\) は加速係数と呼ばれる正の定数で、実際には1から2の間の値をとります。\(\omega = 1\) のとき、SORは標準的なガウス-ザイデル法に帰着することに注意してください。
Pythonのコードは以下のようになります
@jit
def SOR(x, source, solverinfo):
    N = x.shape[0]
    nextx = np.copy(x)
    h = 1/(N-1)
    w = solverinfo.w
    for i in range(1, N - 1):
        for j in range(1, N - 1):
            new = 0.25 * (nextx[j-1, i] + nextx[j+1, i] + nextx[j, i-1]+ nextx[j, i+1]) + 0.25*h**2*source[j, i]
            nextx[j, i] += w * (new - nextx[j, i])
    solverinfo.iterations += 1
return nextxこれを使って\(\omega=1.94\)の問題を解くと、以下のようになります
N = 100
u = init_problem(N)
SOR_info = solverinfo()
SOR_info.w = 1.94
tol = 1e-9
SOR_sol = solve_poisson(u, tol, SOR_info, SOR)

print(f"SOR on a {N} by {N} grid")
print(f"Solution found in {SOR_info.iterations} iterations")
fig, axes = plt.subplots(nrows=1, ncols=2, figsize=(10, 6))
axes[0].imshow(SOR_sol)
axes[0].set_title('Potential')
Ex, Ey = np.gradient(SOR_sol)
E = np.sqrt(Ex**2+Ey**2) # Magnitude of Electric field
axes[1].imshow(E)
_ = axes[1].set_title('Electric Field')
SOR on a 100 by 100 grid
Solution found in 486 iterations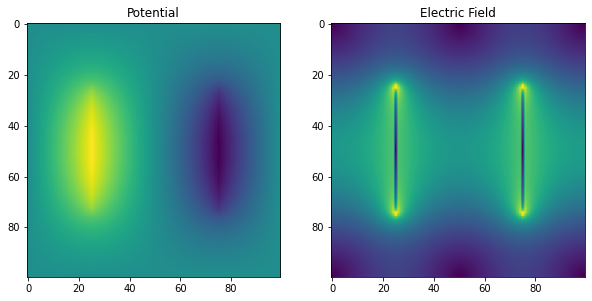
486回の反復は、収束に28,734回の反復を必要としたヤコビ法を使用した最初の試みと比較して59倍以上速いです。
しかし、SORのωパラメータを適切に選択しないと、うまく選択した場合と比べて10倍以上遅くなる可能性があります!それでも、ヤコビ法やガウス・ザイデル法よりは数倍速いです。
N = 100
u = init_problem(N)
SOR_info = solverinfo()
SOR_info.w = 1.5
tol = 1e-9
SOR_sol = solve_poisson(u, tol, SOR_info, SOR)

print(f"SOR on a {N} by {N} grid")
print(f"Solution found in {SOR_info.iterations} iterations")
fig, axes = plt.subplots(nrows=1, ncols=2, figsize=(10, 6))
axes[0].imshow(SOR_sol)
axes[0].set_title('Potential')
Ex, Ey = np.gradient(SOR_sol)
E = np.sqrt(Ex**2+Ey**2) # Magnitude of Electric field
axes[1].imshow(E)
_ = axes[1].set_title('Electric Field')
SOR on a 100 by 100 grid
Solution found in 5872 iterations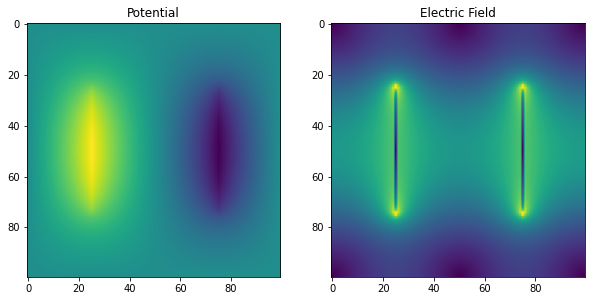
最適なωを推定するための解析的手法が利用可能ですが、経験的に見つける必要がある場合も多くあります。ωの最適値は、解くPDEとグリッドの解像度の両方に依存します。SOR法のさらに収束特性の優れた拡張版も存在します(例えばチェビシェフ加速法など)。これらの手法の並列化スキーム(例えばRed-Black順序付け)も検討できますが、この記事の締め切りまでにアンダーソン加速法に取り組むためには、どこかで止める必要があります!
先に進む前に、この問題に対するSOR法の反復回数をωの関数として見てみましょう。
def SOR_iterations(w):
    N = 100
    u = init_problem(N)
    SOR_info = solverinfo()
    SOR_info.w = w
    tol = 1e-9
    _ = solve_poisson(u, tol, SOR_info, SOR)
    return SOR_info.iterations

w = np.arange(1.0, 1.99, 0.01)
iterations = [SOR_iterations(omega) for omega in w]
plt.plot(w, iterations)
plt.title('Number of iterations vs SOR parameter')
plt.xlabel('w')
_ = plt.ylabel('Iterations')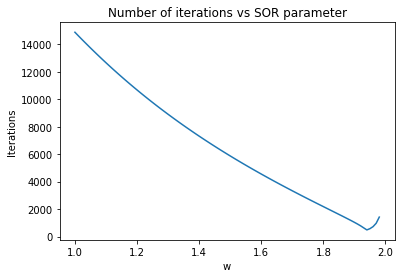
これらの手法にnAGのアンダーソン加速を適用する
nAGからヤコビ反復を呼び出すために必要なコードの適応
私がこの旅を始めたのは、これらの手法がすべて不動点法であることに気づき、nAGのアンダーソン加速が有用かどうか疑問に思ったからです。ヤコビ法に戻って、各反復の定義を思い出してみましょう。
@jit
def jacobi(x, source, solverinfo): # pylint: disable=function-redefined
    """Performs one iteration of the jacobi method

    Arguments:
    x - N x N Matrix containing the previous iteration of the solution
    source - N x N Matrix containing our source function evaluated on the grid
    solverinfo - Takes a solverinfo object to get info in/out of the solver
    """
    N = x.shape[0]
    nextx = np.zeros((N, N))
    h = 1/(N-1)
    # グリッドを繰り返し処理する
    # 内部の点のみを反復処理することで、エッジを変更せずに保持し、したがって
    # 境界条件として、端では x = 0 とする。
    for i in range(1, N - 1):
        for j in range(1, N - 1):
            nextx[j, i] = 0.25 * (x[j+1, i] + x[j, i+1] + x[j-1, i] + x[j, i-1]) + 0.25*h**2*source[j, i]
    solverinfo.iterations += 1
return nextxnAGルーチンであるAndersonアクセラレーションを実行するのは
roots.sys_func_aa であり、そのドキュメントによると、解くべき関数は
fcn(x, data) の形式でなければならず、data は
fcn
に情報を入出力するために使用できる任意のPythonオブジェクトです。そのため、solverinfo
オブジェクトを変更して source
項も保持するようにする必要があります。
他に2つの制約によってこの関数の見た目が変わります:
- ベクトル \(x\) は1次元である必要があります。そのため、これまで使用してきた2次元表現から形状を変更する必要があります。
jacobi(x)の代わりにjacobi(x) - xを返す必要があります。
これらすべてを考慮に入れると、nAG化された jacobi
バージョンとサポートする solverinfo
クラスは以下のようになります:
# この仕様はNumbaのjitコンパイルに必要です
spec = [
    ('iterations', int64),
    ('w', float64),
    ('source', float64[:, :])
]

@jitclass(spec)
class nAG_solverinfo:
    """A class used to get information to/from a solver
    """
    def __init__(self, N=50, _w=1):
        self.iterations = 0
        self.w = 1 # Used for SOR and ignored for everything else
        self.source = np.zeros((N, N))
@jit
def nAG_jacobi(x, solverinfo):
"""Performs one iteration of the jacobi method in the format required by nAG
Arguments:
x - N x N Matrix containing the previous iteration of the solution
source - N x N Matrix containing our source function evaluated on the grid
solverinfo - Takes a solverinfo object to get info in/out of the solver
"""
N = int(np.sqrt(x.size))
x.shape = (N, N) # Make x 2D because that's how I think
nextx = np.zeros((N, N))
h = 1/(N-1)
# グリッドをループ処理する
# 内部の点のみを反復処理することで、エッジを変更せずに保持し、したがって
# 境界条件として、端では x = 0 とする。
for i in range(1, N - 1):
for j in range(1, N - 1):
nextx[j, i] = 0.25 * (x[j+1, i] + x[j, i+1] + x[j-1, i] + x[j, i-1]) + 0.25*h**2*solverinfo.source[j, i]
solverinfo.iterations += 1
nextx -= x # nAG requires this rather than nextx itself
nextx.shape = N*N # Make nextx 1D since that's what nAG needs
return nextxnAG
Anderson加速ルーチンを呼び出すことができるようになりました。m=0に設定すると、加速は適用されず、ルーチンは単に固定点反復のドライバーとして機能します。元のコードとまったく同じ動作が得られるはずです。ヤコビ法が解を得るのに必要な28,734回の反復に至るまで、これが当てはまることがわかります。
これにより、コードの変更がシミュレーションの何も壊していないという確信が得られます。
N = 100
x0 = init_problem(N)
x0.shape = N*N
nAG_jacobi_info = nAG_solverinfo()
nag_source = source(N)
nAG_jacobi_info.source = nag_source
tol = 1e-9
m = 0
nAG_jacobi_sol, fvec = roots.sys_func_aa(nAG_jacobi, x0, tol, eps, m, data=nAG_jacobi_info)print(f"nAG driven Jacobi on a {N} x {N} grid with no acceleration")
print(f"Solution found in {nAG_jacobi_info.iterations} iterations")
fig, axes = plt.subplots(nrows=1, ncols=2, figsize=(10, 6))
nAG_jacobi_sol.shape = (N, N)
axes[0].imshow(nAG_jacobi_sol)
axes[0].set_title('Potential')
Ex, Ey = np.gradient(nAG_jacobi_sol)
E = np.sqrt(Ex**2+Ey**2) # Magnitude of Electric field
axes[1].imshow(E)
_ = axes[1].set_title('Electric Field')nAG driven Jacobi on a 100 x 100 grid with no acceleration
Solution found in 28734 iterations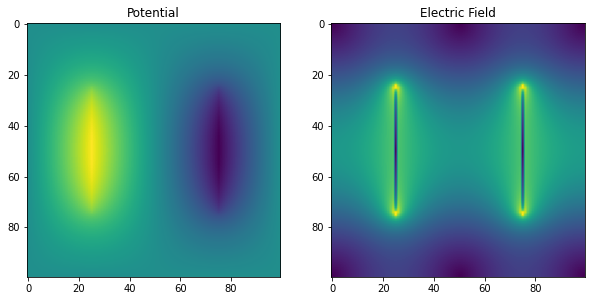
nAGのドキュメントで提案されているようにm=4に設定すると、収束がはるかに速くなります。実際、Gauss
Seidelよりも約3倍速くなりますが、Jacobi反復の数学的な部分を全く変更する必要はありませんでした。そのため、Anderson加速を少なくともある種の不動点反復に対するブラックボックス加速器と考えることができます。
N = 100
x0 = init_problem(N)
x0.shape = N*N
nAG_jacobi_info = nAG_solverinfo()
nAG_jacobi_info.source = source(N)
tol = 1e-9
m=4
nAG_jacobi_sol, fvec = roots.sys_func_aa(nAG_jacobi, x0, tol, eps, m, data=nAG_jacobi_info)
print(f"Anderson Accelerated Jacobi with m={m} on a {N} by {N} grid")
print(f"Solution found in {nAG_jacobi_info.iterations} iterations")
Anderson Accelerated Jacobi with m=4 on a 100 by 100 grid
Solution found in 5437 iterationsここで、mの選択がヤコビ法の必要反復回数にどのように影響するかを調査します。
def find_best_m(m):
    N = 100
    x0 = init_problem(N)
    x0.shape = N*N
    nAG_jacobi_info = nAG_solverinfo()
    nAG_jacobi_info.source = source(N)
    tol = 1e-9
    _ = roots.sys_func_aa(nAG_jacobi, x0, tol, eps, m, data=nAG_jacobi_info)
    return nAG_jacobi_info.iterations
mlist = np.arange(1, 200, 1)
iterations = [find_best_m(m) for m in mlist]
plt.plot(mlist, iterations)
plt.title('Anderson Accelerated Jacobi\nNumber of iterations vs m')
plt.xlabel('m')
_ = plt.ylabel('Iterations')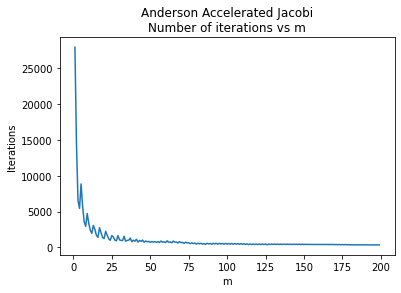
これはSORの加速パラメータよりもはるかに優れています。高い値を選ぶだけで、良好なパフォーマンスが確実に得られます。上記で探索した値よりもさらに高い値を使ってみましょう。次に進む前にm=250を使用してみましょう。
N = 100
x0 = init_problem(N)
x0.shape = N*N
nAG_jacobi_info = nAG_solverinfo()
nAG_jacobi_info.source = source(N)
tol = 1e-9
m = 250
nAG_jacobi_sol, fvec = roots.sys_func_aa(nAG_jacobi, x0, tol, eps, m, data=nAG_jacobi_info)

print(f"Anderson Accelerated Jacobi with m={m} on a {N} by {N} grid")
print(f"Solution found in {nAG_jacobi_info.iterations} iterations")
fig, axes = plt.subplots(nrows=1, ncols=2, figsize=(10, 6))
nAG_jacobi_sol.shape = (N, N)
axes[0].imshow(nAG_jacobi_sol)
axes[0].set_title('Potential')
Ex, Ey = np.gradient(nAG_jacobi_sol)
E = np.sqrt(Ex**2+Ey**2) # Magnitude of Electric field
axes[1].imshow(E)
_ = axes[1].set_title('Electric Field')
Anderson Accelerated Jacobi with m=250 on a 100 by 100 grid
Solution found in 313 iterations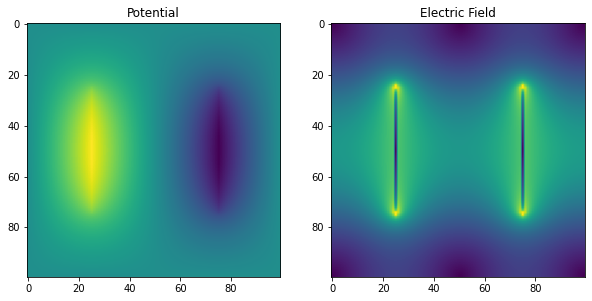
これは加速なしのヤコビ法と比べて90倍以上速く収束しており、最適なSOR法をも大きく上回っています。
アンダーソン加速とガウス・ザイデル法
次に、アンダーソン加速をガウス・ザイデル法と組み合わせます。ガウス・ザイデル法はヤコビ法よりもかなり高速なので、この新しい組み合わせがさらに優れていることを期待できるかもしれません。
@jit
def nAG_gauss_seidel(x, solverinfo):
    N = int(np.sqrt(x.size))
    x.shape = (N, N) # Make x 2D because that's how I think
    nextx = np.copy(x)
    h = 1/(N-1)
    for i in range(1, N - 1):
        for j in range(1, N - 1):
            nextx[j, i] = 0.25 * (nextx[j+1, i] + nextx[j, i+1] + nextx[j-1, i] + nextx[j, i-1]) + 0.25*h**2*solverinfo.source[j, i]
    solverinfo.iterations += 1
    nextx -= x  # nAG requires this rather than nextx itself
    nextx.shape = N*N  # Make nextx 1D since that's what nAG needs
    return nextx
# ガウス・ザイデル法とnAGアンダーソン加速を使用してシミュレーションを定義し実行する
N = 100
x0 = init_problem(N)
x0.shape = N*N
nAG_gs_info = nAG_solverinfo()
nAG_gs_info.source = source(N)
tol = 1e-9
m = 4
nAG_jacobi_sol, fvec = roots.sys_func_aa(nAG_gauss_seidel, x0, tol, eps, m, data=nAG_gs_info)
print(f"Anderson Accelerated Gauss-Seidel with m={m} on a {N} by {N} grid")
print(f"Solution found in {nAG_gs_info.iterations} iterations")Anderson Accelerated Gauss-Seidel with m=4 on a 100 by 100 grid
Solution found in 577 iterations標準的な選択であるm=4で、SORで見つけられる最良のωの値とほぼ同等の性能を発揮しています。m=7に切り替えると、SORよりもさらに良い結果が得られます。
# ガウス・ザイデル法とnAGアンダーソン加速を使用してシミュレーションを定義し実行する

N = 100
x0 = init_problem(N)
x0.shape = N*N
nAG_gs_info = nAG_solverinfo()
nAG_gs_info.source = source(N)
tol = 1e-9
m = 7
nAG_jacobi_sol, fvec = roots.sys_func_aa(nAG_gauss_seidel, x0, tol, eps, m, data=nAG_gs_info)
print(f"Anderson Accelerated Gauss--Seidel with m={m} on a {N} by {N} grid")
print(f"Solution found in {nAG_gs_info.iterations} iterations")
Anderson Accelerated Gauss--Seidel with m=7 on a 100 by 100 grid
Solution found in 445 iterations再び、私たちは完璧な加速パラメータを見つける必要に迫られています。mの値によって反復回数がどのように変化するか見てみましょう。
def find_best_m(m): # pylint: disable=function-redefined
    N = 100
    x0 = init_problem(N)
    x0.shape = N*N
    nAG_gs_info = nAG_solverinfo()
    nAG_gs_info.source = source(N)
    tol = 1e-9
    _ = roots.sys_func_aa(nAG_gauss_seidel, x0, tol, eps, m, data=nAG_gs_info)
    return nAG_gs_info.iterations
mlist = np.arange(1, 200, 1)
iterations = [find_best_m(m) for m in mlist]
plt.plot(mlist, iterations)
plt.hlines(486, -1, 200, 'r')
plt.title('Anderson Accelerated Gauss--Seidel\nNumber of iterations vs m')
plt.xlabel('m')
plt.ylabel('Iterations')
label_x = 30
label_y = 1500
arrow_x = 20
arrow_y = 500
arrow_properties = dict(
facecolor="black", width=0.5,
headwidth=4, shrink=0.1)
_ = plt.annotate(
"Best SOR result", xy=(arrow_x, arrow_y),
xytext=(label_x, label_y),
arrowprops=arrow_properties)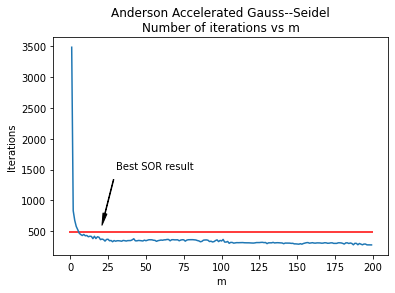
加速されたヤコビ法の反復と同様に、ガウス・ザイデル法のアンダーソン加速パラメータの状況は、SORパラメータよりもかなり良好です。少なくともこのシミュレーションでは、m>6のすべての場合において、最良のSOR結果(486回の反復)を常に上回っており、最も良い結果はm=200で285回の反復となっています。さらに、このシミュレーションではm=10を超えると曲線がかなり平坦になり、mの選択が悪くても過度に罰せられることがないことを意味しています。
# ガウス・ザイデル法とnAGアンダーソン加速を使用してシミュレーションを定義し実行する

N = 100
x0 = init_problem(N)
x0.shape = N*N
nAG_gs_info = nAG_solverinfo()
nAG_gs_info.source = source(N)
tol = 1e-9
m = 200
nAG_jacobi_sol, fvec = roots.sys_func_aa(nAG_gauss_seidel, x0, tol, eps, m, data=nAG_gs_info)
print(f"Anderson Accelerated Gauss--Seidel with m={m} on a {N} by {N} grid")
print(f"Solution found in {nAG_gs_info.iterations} iterations")
Anderson Accelerated Gauss--Seidel with m=200 on a 100 by 100 grid
Solution found in 285 iterationsSORとアンダーソン加速の組み合わせ
次に自然に浮かぶ疑問は「両方の加速方法を組み合わせて、これまで見てきたどの方法よりもさらに良い結果を得ることができるだろうか?」ということです。
@jit
def nAG_SOR(x, solverinfo):
    N = int(np.sqrt(x.size))
    x.shape = (N, N) # Make x 2D because that's how I think
    nextx = np.copy(x)
    h = 1/(N-1)
    w = solverinfo.w
    for i in range(1, N - 1):
        for j in range(1, N - 1):
            new = 0.25 * (nextx[j-1, i] + nextx[j+1, i] + nextx[j, i-1]+ nextx[j, i+1]) + 0.25*h**2*solverinfo.source[j, i]
            nextx[j, i] += w * (new - nextx[j, i])
    solverinfo.iterations += 1
    nextx -= x  # nAG requires this rather than nextx itself
    nextx.shape = N*N  # Make nextx 1D since that's what nAG needs
    return nextx
# SORとnAG Anderson Accelerationを使用してシミュレーションを定義し実行する
N = 100
x0 = init_problem(N)
x0.shape = N*N
nAG_SOR_info = nAG_solverinfo()
nAG_SOR_info.w = 1.94
nAG_SOR_info.source = source(N)
tol = 1e-9
m = 200
nAG_SOR_sol, fvec = roots.sys_func_aa(nAG_SOR, x0, tol, eps, m, data=nAG_SOR_info)
print(f"Anderson Accelerated SOR with m={m} and w={nAG_SOR_info.w} on a {N} by {N} grid")
print(f"Solution found in {nAG_SOR_info.iterations} iterations")Anderson Accelerated SOR with m=200 and w=1.94 on a 100 by 100 grid
Solution found in 330 iterationsこれまでに見つかったmと\(\omega\)の最良の値を使用しても、それぞれを独立して使用するよりも悪い結果になったことがわかります。
mと\(\omega\)の範囲をスキャンした結果、以下のような結果が得られました
def find_best_mw(m, w):
    N = 100
    x0 = init_problem(N)
    x0.shape = N*N
    nAG_SOR_info = nAG_solverinfo()
    nAG_SOR_info.source = source(N)
    nAG_SOR_info.w = w
    tol = 1e-9
    _ = roots.sys_func_aa(nAG_SOR, x0, tol, eps, m, data=nAG_SOR_info)
    return nAG_SOR_info.iterations
# これには非常に長い時間がかかるでしょう!
wlist = np.arange(1.01, 1.99, 0.01)
mlist = np.arange(5, 200, 1)
mw_list = [(m, w, find_best_mw(m, w)) for m in mlist for w in wlist]# ベスト5
mw_list.sort(key=lambda x:x[2])
mw_list[0:10][(199, 1.6700000000000006, 230),
(198, 1.6600000000000006, 231),
(198, 1.6700000000000006, 231),
(198, 1.6800000000000006, 231),
(198, 1.7300000000000006, 231),
(199, 1.6400000000000006, 231),
(199, 1.6500000000000006, 231),
(199, 1.6600000000000006, 231),
(199, 1.6800000000000006, 231),
(199, 1.6900000000000006, 231)]# 最悪の10
mw_list.sort(key=lambda x:x[2], reverse=True)
mw_list[0:10][(5, 1.9800000000000009, 1543),
(6, 1.9800000000000009, 1479),
(8, 1.9800000000000009, 1442),
(7, 1.9800000000000009, 1352),
(9, 1.9800000000000009, 1326),
(11, 1.9800000000000009, 1281),
(10, 1.9800000000000009, 1192),
(12, 1.9800000000000009, 1175),
(15, 1.9800000000000009, 1122),
(13, 1.9800000000000009, 1107)]最良の結果はすべて、アンダーソン加速係数mの値が高くなっています。時間を節約するために、そこに検索を制限することもできたでしょう。このシミュレーションでは、mに関しては多いほど良いのです。しかし、SORの\(\omega\)の最適値を見つけることは、それほど明白ではありません。
SORとアンダーソン加速を使用することで、純粋なSORやアンダーソン加速されたガウス・ザイデル法よりも良い結果を得ることができますが、\(\omega\)とmの最適な組み合わせを選ぶのはより難しくなります。さらに、その効果は徐々に減少していきます。
結論
アンダーソン加速は、多くの固定点反復法を加速するための一般的な方法です。我々は、2次元のラプラス方程式とポアソン方程式を解くための従来のヤコビ法、ガウス・ザイデル法、SOR法で必要な反復回数を減らすために使用できることを示しました。
アンダーソン加速では、次の反復を生成するために使用される過去の反復回数を指すパラメータmをユーザーが選択する必要があります。このシミュレーションでは、mの高い値が良い結果をもたらし、mの値を間違えても大きなペナルティはありません。
| 方法 | 非加速 | 加速 |
|---|---|---|
| ヤコビ法 | 28734 | 313 |
| ガウス・ザイデル法 | 14877 | 285 |
| SOR | 486 | 230 |
